My last post was about starting the process of removing the left-side ventilation assembly. After removing the coolant hose from the top of the left-side heat exchanger, I figured I'd just get that hose out entirely. It was a patch job due to the failure of the right-side air duct.
The hose in question is the one coming down from above, looping around and into a heater pipe. The clamp came off easy enough - and as expected, the hose was pretty much stuck on there. After some poking around with a small flathead screwdriver, I surrender and fetch a small box-cutter, and start cutting the top of the hose straight back. Hmm, not enough... cut some more... wait... what's this green liquid dribbling out? Oh crap. Not only did my cousin leave the car parked for years with gas in the tank, he didn't drain the COOLANT!
I quickly fetched a bucket and get it under the drip, and decided at that point the prudent thing would be to leave it be and let it drain out on its own.
So, next job on the task - get all the coolant out. I poke around in the service manual CD and find the job for this - basically its very simple, a matter opening a pair of drain cocks - one on the engine, one under the radiator.
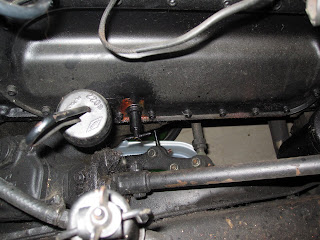
Here's the engine mounted drain cock...
...and the one on the radiator. Both were stuck fast - big surprise. I ended up hitting both with penetrant about three times over a while, letting it soak in between each application. And that, plus using a pair of needlenose pliers to get better purchase on them, they came right open. The engine mount drain yielded not a drop...
Not so with the radiator drain. Action shot!
Next, I started trying to remove the battery tray. A fellow on the Ponton group had some questions regarding the firewall and a mount attached to the firewall in this area, beneath the battery tray. I figured I'd try and help this guy out by removing my battery tray next and snap some helpful photos. But, issues arose with this task, and it may be a while before I actually get it out. I'll write this bit up as a whole once it's done.
Part of removing the battery tray involves getting at a nut that is behind a plate that runs along the very back (or front, as far as the car is oriented) of the passenger area, up underneath the dashboard area. I suspect I'll have to get all the dashboard and instrumentation out before I can get to this long plate. So, let's get back on that front.
Here's a shot of the underside of the dashboard area. The radio is directly above. Pictured are a Reims shortwave adapter, and a power supply unit made by Becker (radio manufacturer). Here's a page on the Ponton site all about the various radios and accessories for these era cars. Scroll down near the bottom for some info/photos of the Reims unit, contributed by Ramzi Saba.
Last night, while poking around this page, I clicked on Ramzi's name (a link) and found a photo he contributed:
This is a shot of Riad El Solh Square, downtown Beirut, circa 1969. Look at all the Pontons!
Back to the task at hand:
I figure the best route is to remove the rear unit first. It's mounted by a pair of bolts, one on each side. The left side has what appears to be a ground wire in the mix.
One cable has a fuse held inside a simple twist-open connector. Easy peasy.
Next is this larger connector. This is held on by a metal piece that slides over the back end. Simple matter to pull this piece up and over, and tugging the connector out.
Now all that's left is a pair of wires.
This is a bit of a quandary, though. I'm unsure as to how to release these wires. I ended up emailing Ramzi (mentioned above) last night, and he got back to me early this morning (he's in Beirut, I believe) telling me there are screws down in those areas. I'll be heading down and poking about some more later. I'm also quizzing Ramzi on the best way to get all this gear out - the proper order of removal.
UPDATE: Sure enough, looking much closer than I had before, there are small flathead screws in those holes. A few turns of a small driver and the wires easily came loose.
Subscribe to:
Post Comments (Atom)


No comments:
Post a Comment