Oooh these bits were fun. I had to enlist my neighbor Frank and his brother Edward on this task.
The shells themselves are in fine shape - whew! And are easily detached by removing a single screw at the back.
A bit of a mess inside, however. Some rust and a material in the back of that area that has deteriorated. I figure it was some sort of padding.
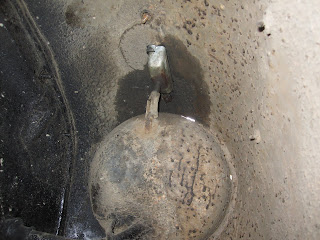
A shot from the inside of the driver's side wheelwell. The curved area at the bottom is the headlight area. The shinier metal area is the bottom of the assembly coming in from above - the right side has the remnants of some sort of protective piece wrapped around this assembly. The cables for the blinker snake up through the part coming off the bottom of the assembly, going into the headlight area.
A closer shot from the top, with some of the deteriorated padding material on display. Yum.
The most difficult part of removing these bits are the front-most bolts. Here you see Frank with an impact driver, attempting to loosen the passenger-side bolt. This bolt eventually loosened, but also loosened the nut from below that was held on by a clip - so both were spinning together. It was impossible to get any sort of substantial grip on the nut inside the wheelwell, due to the tube for the electrical wires being in the way. Eventually a dremel was employed to cut the top of the bolt off from above.
On the passenger side, Frank and Edward have gotten out their tap set. In this pic, Edward is drilling a hole in the bolt head, in preparation for getting the tap in there, and working the bolt out.
A nicer photo of the inside of the wheelwell, this time from the passenger side. The shell around that one assembly is shot on this side as well - you can see a fragment of it poking around from the left. The square nut holding the front-end bolt is also visible, below/right. A mount attached to the trim piece is also visible, above/left - the nut has already been removed.
Success! The trim pieces have been removed, and without breakage.
One issue with the trim - one of these pieces has a bent bolt. It took a bit of wriggling to get this one out, as we were unaware of this situation at the time. I figure at some point, a large rock got bounced up into the wheelwell, struck this bolt and bent it a bit.
There's a vendor out there who makes custom-fit wheelwell covers for these old buggies - they're not terribly expensive, as best I could tell (around $150 each? I'll have to find their site again). I'm strongly leaning toward investing in a set of these at the appropriate time - to protect everything up inside that wheelwell once it's all cleaned up.
The other big issue will be finding replacements for the rubber seals, between the trim and the top of the fender. Very odd shape, and as best I can tell, the bits that were outside the sides of the trim itself were a bit thicker (i.e. the rubber wrapped around the edge of the trim slightly).
Subscribe to:
Post Comments (Atom)


No comments:
Post a Comment