Saturday, February 27, 2010

Instrument cluster and side mirror removal

Yesterday, I got Ernie to swing by for a few minutes, so I could pick his brain. One of the things I quizzed him on was the removal of the instrument cluster. So, with that knowledge trapped in my head, I set out to get that sucker removed today.


Here's the back of the instrument cluster area. First thing is to pop those two springs off the mounts. Easy peasy.


Next is to remove this cable that is snaking its way around and into the side of the engine. The hidden part is a post that goes in, much like a catheter - this is the engine temperature cable.


A bit of Deep Creep, and a couple of medium whacks on a 14mm wrench with a hammer... and it's loose. One thing Ernie had mentioned was that the nut should spin around the main post. I tried holding the center piece steady with some needlenose pliers while spinning the nut with a wrench, and had no luck. But, it came out alright in the end, it appears.


Next is to unplug an 8-pin connector. There's a pair of flathead screws on one end that loosen up.


A shot of the insides of this connector.


Next task is to get the instrument cluster pulled out part-way. There are some other connections that have to be removed from the inside of the car.


Here's what I believe is the trip meter reset (the long skinny pipe piece with the nut toward the end). Normally mounted under the instrument cluster on a piece of the wood dash with several mount holes, with a knob screwed on the end.


This cable snakes through a hole in the firewall. Inside shot...


...and outside. A simple matter of removing the nut, maneuvering the solid pipe part through and around some other wiring, and getting it in proper position to tug out through the firewall.


And there it is! One more task done.


Now I'm able to get the cluster out a ways.


I believe this is the speedometer cable connector...


...and this the oil temperature gauge connector. I'll update with corrections later if I find I'm mistaken (and I probably am). Both of these come off easily.


At this point, I'm still stuck - what did I miss? Well there's one last connector on the left.... aha! Engine temperature sensor! This cable is threaded through the center engine compartment plate, and held in place with a rubber grommet. Said rubber is toast after 52 years, and I end up cutting it away/picking it apart, so I can pass the loose end of the engine temp sensor through (big nut and all). A bit more maneuvering, and...


...it's out!


Now the dashboard looks REALLY pitiful. Time for it to come out as well... at least, that's what I'm telling myself.


First, the vents. This vent is loose but won't just tug out - there's a piece of the vent hose still attached on the back side.


Once that's out, the vent comes away without trouble.

The passenger vent still has a spring attached, I discovered, when trying to remove the dash (see below).

At this point, I was stumped - the dashboard seemed pretty well stuck. So, I do what I do in these cases - post a "help!" comment on the Ponton list. And Phil, one of the Pontoneers, replied after a little while with some info that led me here:

 
Yes, that's a screw on the *inside* of the dashboard. And it took sticking a mirror in there to find out where that sucker was. How annoying and bizarre! Fortunately I have small hands, and an even smaller screwdriver - which barely fit into the gap. I had to use fingertips on both hands, reaching in both holes, to get that screw out.

  
Lo and behold, the dash comes away! Well, mostly.

  
 There's the matter of freeing the right-side vent (see above) and disconnecting the cigarette lighter base... 


And it's off! Phew.


In between attempts at getting the dash off, I notice that the side mirror is stupid easy to remove. Just a couple of nuts to remove.


Here's a pic of the rubber seal once the mirror is off. Amazingly, it's in pretty good shape - I may not have to replace it!


Mirror, rubber seal, nuts and the metal crosspiece from the inside of the door, reunited and now living on a shelf.

Friday, February 26, 2010

Draining coolant, and the start of removing the radio.

My last post was about starting the process of removing the left-side ventilation assembly. After removing the coolant hose from the top of the left-side heat exchanger, I figured I'd just get that hose out entirely. It was a patch job due to the failure of the right-side air duct.


The hose in question is the one coming down from above, looping around and into a heater pipe. The clamp came off easy enough - and as expected, the hose was pretty much stuck on there. After some poking around with a small flathead screwdriver, I surrender and fetch a small box-cutter, and start cutting the top of the hose straight back. Hmm, not enough... cut some more... wait... what's this green liquid dribbling out? Oh crap. Not only did my cousin leave the car parked for years with gas in the tank, he didn't drain the COOLANT!

I quickly fetched a bucket and get it under the drip, and decided at that point the prudent thing would be to leave it be and let it drain out on its own.

So, next job on the task - get all the coolant out. I poke around in the service manual CD and find the job for this - basically its very simple, a matter opening a pair of drain cocks - one on the engine, one under the radiator.


Here's the engine mounted drain cock...


...and the one on the radiator. Both were stuck fast - big surprise. I ended up hitting both with penetrant about three times over a while, letting it soak in between each application. And that, plus using a pair of needlenose pliers to get better purchase on them, they came right open. The engine mount drain yielded not a drop...


Not so with the radiator drain. Action shot!

Next, I started trying to remove the battery tray. A fellow on the Ponton group had some questions regarding the firewall and a mount attached to the firewall in this area, beneath the battery tray. I figured I'd try and help this guy out by removing my battery tray next and snap some helpful photos. But, issues arose with this task, and it may be a while before I actually get it out. I'll write this bit up as a whole once it's done.

Part of removing the battery tray involves getting at a nut that is behind a plate that runs along the very back (or front, as far as the car is oriented) of the passenger area, up underneath the dashboard area. I suspect I'll have to get all the dashboard and instrumentation out before I can get to this long plate. So, let's get back on that front.


Here's a shot of the underside of the dashboard area. The radio is directly above. Pictured are a Reims shortwave adapter, and a power supply unit made by Becker (radio manufacturer). Here's a page on the Ponton site all about the various radios and accessories for these era cars. Scroll down near the bottom for some info/photos of the Reims unit, contributed by Ramzi Saba.

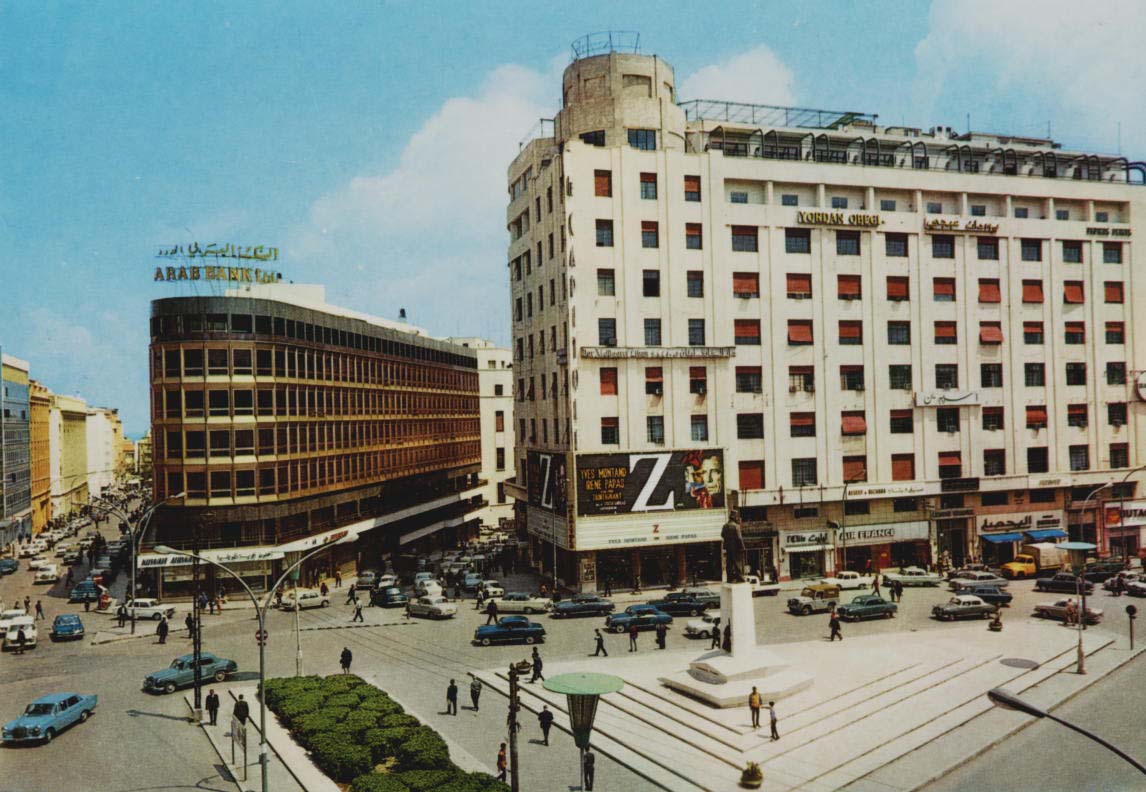
Last night, while poking around this page, I clicked on Ramzi's name (a link) and found a photo he contributed:

This is a shot of Riad El Solh Square, downtown Beirut, circa 1969. Look at all the Pontons!

Back to the task at hand:


I figure the best route is to remove the rear unit first. It's mounted by a pair of bolts, one on each side. The left side has what appears to be a ground wire in the mix.


One cable has a fuse held inside a simple twist-open connector. Easy peasy.


Next is this larger connector. This is held on by a metal piece that slides over the back end. Simple matter to pull this piece up and over, and tugging the connector out.


Now all that's left is a pair of wires.


This is a bit of a quandary, though. I'm unsure as to how to release these wires. I ended up emailing Ramzi (mentioned above) last night, and he got back to me early this morning (he's in Beirut, I believe) telling me there are screws down in those areas. I'll be heading down and poking about some more later. I'm also quizzing Ramzi on the best way to get all this gear out - the proper order of removal.

UPDATE: Sure enough, looking much closer than I had before, there are small flathead screws in those holes. A few turns of a small driver and the wires easily came loose. 

Tuesday, February 23, 2010

More Fun With Heater Box Corpses

Yesterday, I brave the chill in my garage to go pull some more bits off the old girl.

I figured I'd tackle the surviving (or at least, APPEARS to be surviving) heater box and related bits in this go.


First off is the coolant hose coming in from the top. Remove the clamp, and a bit of poking with a small flathead screwdriver, and off it goes!


Next, I removed a small mounting plate on the forward end of the top of the heat exchanger, which had attached to it a mount for what I assume is the windshield wiper fluid reservoir.


At this point, I realize that I'm not going to get very far without removing the drainage hose from the bottom of the heat exchanger - and accessing that from the top? No way. I'll have to get under the car - and that's not going to happen while it's on its wheels. I need to get the front end set up on jackstands for that task.

And while leaning over and poking a light down that way - I can see where the cardboard of the air duct has degraded significantly, farther down and going underneath. I suspected as much.

Seeing as it's freaking cold out, and I don't want to monkey with getting the jack and jackstands squared away - plus the fact that I'd really like to get some other opinions on WHERE to place the jackstands so as not to cause damage or risk the car dropping - I decide to put this off for another day. Instead, I figure I'll switch sides and remove the last remnant of my right side heater box, which is a mounting plate.


Looks easy enough. Four screws right? Well, maybe not. Maybe only three, and something else going on.

I get the three screws out (two easily; one strips immediately and with a combination of Deep Creep, a drill, and some needlenose pliers, I get it out in time)... but that last bit doesn't look right. Done for the night, methinks.


The next day, after consulting the oracle (otherwise known as the Ponton group), I learn that there's a bolt that comes from inside the passenger area, that threads through part of the mount. And sure enough, those bits are on the mount plates on my new heater box reproductions. A little poking about above the passenger floorboard...


...and there it is, that bolt on the right side. Easy enough to remove. Then it's a matter of fighting some 52-year-old rubber that just doesn't want to let go.


Done and done. And this process reveals a couple of small spots that have rusted out. Nothing critical, I figure, but we'll see when the time comes that I have the body properly stripped.

I'll obviously need new rubber gaskets to go between these areas and the mounting plates of the heater boxes. I'm also going to need similar rubber bits for sealing up the areas between the heater boxes and the heat exchanges on the top. Both of these bits seem pretty simple, just flat pieces trimmed down properly - I may well just get some sheets of an appropriate material, find or make some templates, and cut'em out myself. One fellow on the Ponton group thinks he has a spare pair of the heat exchanger seals - we'll see.


Aha! A German site has both gaskets listed...
http://85.25.136.73/Thyssen-p463h20s29-Gummidichtung-Waerme.html (heat exchanger)
http://85.25.136.73/Thyssen-p462h20s29-Gummiunterlage-Luftk.html (heater box plate)

There's also rolls of gasket material (of various thickness) available out on the internets as well. I may just go that route with these pieces, save myself a fair bit of filthy lucre.

Sunday, February 21, 2010

Hood hinges and firewall covers

Today I braved the chilly garage (it's been snowing here fairly steady the past few days) and tackled getting the hood hinges and the old ratty firewall covers off.


After pulling the battery out, the four small screws holding this piece on are very evident (and accessable).


Once the cover is out (in two pieces), this is what I discover. It is just the first of several "holy crap what has been GROWING in here" moments to come.


The cover (or what's left of it), from the opposite side. Not sure what caused that hole toward the left side. I'm hoping my fellow Pontoneer neighbor Ernie will end up fabricating me a set of these covers once he gets his pattern right and makes a set for himself (see yesterday's post).


Here's a closer shot of some of the detritus found behind the cover. I believe, from recent postings on the Ponton group, this is the remnant of a hose that directs heated air to the front windshield defroster. Folks described the original hoses as paper wrapped around springs, and said hoses had a near 90-degree bend on one end. Some of the talk regarding these hoses was to do with more modern substitutes for these old hoses, pieces that would last far longer.


Another cover remnant, with most of the padding (meant to deaden sound, I believe) still attached. The back side appears to be a thin layer of cardboard.


A shot of that same area behind the removed cover, once I fished out most of that ratty residue. Looks like this bundle of wires has lost some of the collective wrapping. I figure I'll be replacing as many of the electrical cables as I can manage, just for safety's sake and for long-term reliability.


Passenger side hood hinge. In this shot I've already removed the hex nut holding the front of the hinge to the side of the engine compartment. Thank you, Deep Creep! (That stuff came in handy today).


Same hood hinge, but a shot of the rear end of it, from above. Passenger compartment is to the left. Just have to remove these nuts.


Hinge removed - this is a shot to show the bits on top and bottom of that area. Rounded caps over rubber pieces. The rubber seems to be in good shape, but I don't know how well they would hold up if I remove them. I'd like to get the hinges down to just the metal, so they can be cleaned off and repainted in time. I got the caps off one hinge, but am hesitant to start trying to work the rubber bits off, as they are fairly well stuck on. I fear destroying them. I'll be looking around to see if replacement bits are out there, and if they're not too pricy, then I'll just tear the existing ones off.


Driver's side, same area, after the hinge was removed. More small cover pieces have come out of these areas, in equally crappy condition and having left behind a lot of the attached padding. I feel like I ought to go get a hand-held vacuum to clean all this nasty stuff out.