Monday, November 30, 2009

Sticker shock

Today, I'm learning that if I were to buy all new parts from Mercedes-Benz to replace the bits of the ventilation system I'm currently missing - the heater box (see previous post), and the various connecting bits, clamps, and screens - and still using the main heater core unit I worked on cleaning up yesterday - it will run me about $1200.

Gah.

This is just one small portion of the car - and there's *so much* more to it. Granted, a lot of it is fairly generic - body stripping and repair, paint... but still.

And a lot of it is NOT fairly generic. The whole interior is going to be fun. And I'm certain there will be a fair number of small, seemingly insignificant parts that will be a) hard to find b) pricy c) both.

I'm hoping I can make some connections with some other folks who've been at this for a while - folks who have spare bits lying around they're willing to part with for a decent price. I've already been dealing with a couple of folks, but I don't know how much stuff these guys have access to. Time will tell.

One good bit today - some of the wood dashboard pieces I purchased arrived today! The last piece (the main long dashboard piece) is still en route.


AUUGGHH TECHNOLOGY

Yesterday I signed up for a freebie subscription to MB's EPC - Electronic Parts Catalog. This is apparently a treasure trove of info on these cars - all the parts listed, exploded illustrations, etc. etc. ad nauseum.

The trick is, it's a Java Web Start app. Not a problem in general, except for me.

1) It errors out on my Macs.
2) Running it on my emulated Windows install on my Mac kinda works, but there are major graphical issues.

Next step is to do a straight-up Windows install on my Mac laptop using Boot Camp (a way to set up a Mac to be dual-boot, Mac OS and Windows). I'd like to set it up using WinXP, which I have - but I need an install disc that has Service Pack 2 as part of the install. My install discs pre-date SP2. GRRRR.

So I'm hoping I can find a friend nearby with an newer install disc I can borrow for this install...

Another 220S restoration blog

Doing some googling around on heater boxes this evening, I stumbled upon this blog:

http://mb220s.blogspot.com/

I've only gone a few pages through, but I have a feeling it's going to be a helpful site to reference now and again as I go through similar phases in my project...

Sunday, November 29, 2009

Heater box

Today, I truly start on getting this car back in shape.

The first thing I'm tackling is what's called a "heater box". It's a bit that, as best I can tell, takes heat from the radiator and shuffles it through to the vents in the passenger area.


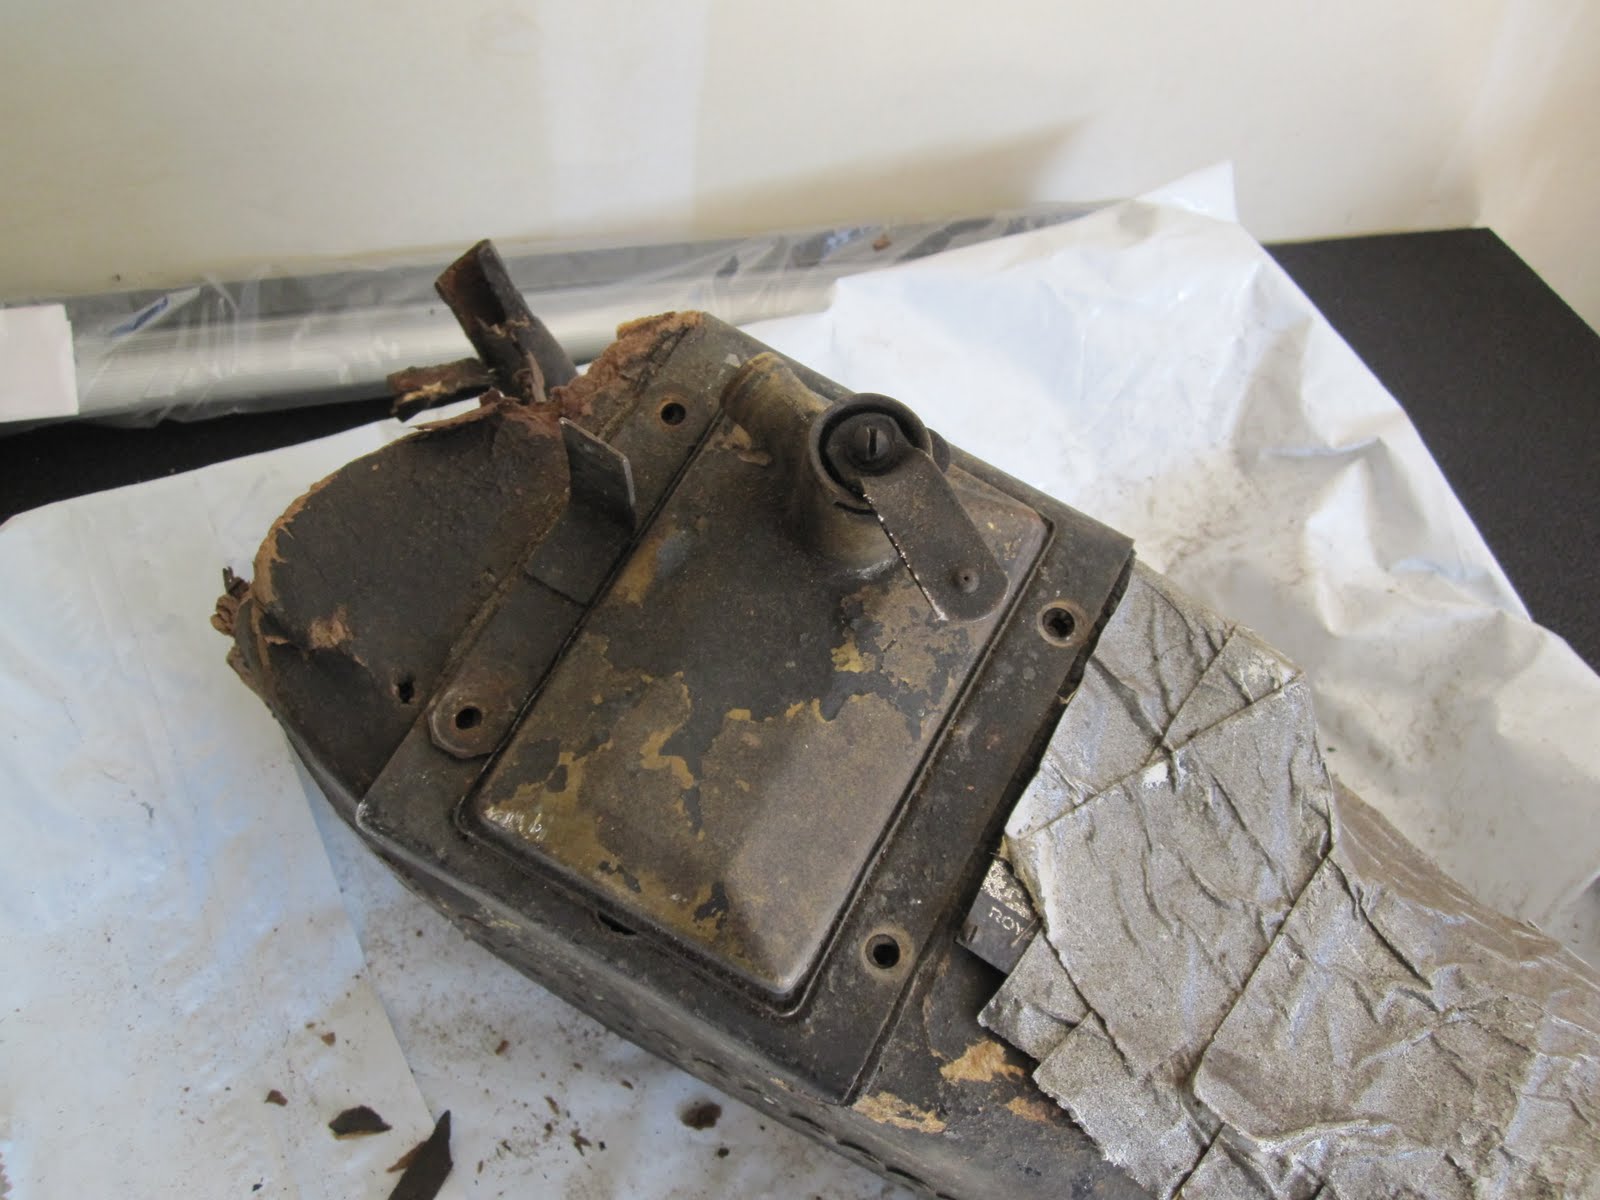
This is the heater box on the driver's side. It's reasonably intact.


This is what's left of the heater box on the passenger side of the engine. Not quite intact. :)

The main shells of these things are made of *cardboard*. Thick cardboard - sturdy cardboard - but cardboard. And hence, prone to rot and disintegrate. You can see where someone (my dad, or my cousin - no telling) threw some duck tape on the left side at one point.

In the main part, however, is the radiator. I'm hoping this part is salvageable. So, first order of business - get rid of all that old flaky cardboard.


The bit near the top, with the remnant of a hose attached, is a valve that controls whether heat is passed out to the air vent in the dashboard. At least, that's the impression I currently have. I could be wrong. :)

There's a good page on repairing this valve on the Ponton site:


So far so good. However, I'm unsure as to how these heater boxes were assembled. From what I can tell, the radiator part (see below) is inserted into a slot in the shell, and then attached.

My problem now is that there seems to be parts of the cardboard up under the lip of the top of the radiator, that I can't get to. I can't yet tell if the top part, with the valve, comes off the main part of the radiator, allowing for the removal of the cardboard trapped between.

Photos of replacement heater cores show them without the top plate where the valve is, so I assume it's removable.


Fortunately, there are replacements available - the heater radiators themselves (should this one be shot), and the shells. Nowadays, there are plastic shells available, instead of the cardboard. Much sturdier! My intent is to set up the Merc with these plastic shells. I've waffled back and forth as far as how "authentic" I want to go with this restoration - and I've decided that mechanically, I'm not going to worry too much about that, and set things up as bulletproof as possible. I don't intend to turn this into a show car, I don't intend to sell it - I intend to DRIVE it and to keep it as long as I possibly can.

We'll see how much these plastic shells cost. I've seen prices from around $95 for the plastic (or fiberglass) shell, sans mount holes/etc., to $575 for a complete heater box (excluding the radiator, which goes for around $225). I've poked around one online parts site, and there are photos of some bits, no photos of others. I guess I'll have to wait to get ahold of the service manual CDs to really get a good idea.

Update: A fellow on the Ponton group tells me that the top plate is permanently attached to the radiator, and suggested soaking that bit in water overnight to goo up the cardboard so it could be scraped out.

I wonder if this was always the case, though, as I've seen photos of just the radiator on online parts sites, without the top plate.

Update 2: After soaking the cardboard-infested area of the unit for a couple or three hours, I went back down to the garage and managed to scrape away the remaining cardboard, along with the remains of a rubber seal around that area as well. I'm now left with what appears to be the radiator itself, and the metal plate sitting on top. I can see a metal lip on the plate, that comes down around the radiator on that end just a bit. Another fellow on the Ponton site said he had to work the two pieces apart by getting a putty knife in there to loosen them up. Looks like a fun job. :/


What a mess!

Also, another Pontoneer posted that he has some spare heater cores that he's willing to part with, so if this particular core (or even the other, that's still in the car) is bad, I've got options.

Update 3: Whew, glad I didn't go any further. Turns out the heater core is inside a framework that is part of the metal plate. If I'd somehow gotten them apart, that would have been bad.

I pulled that padded area off the bottom (see above pic) and puzzled out that the heater core slides up into that framework. That, plus the pic of a heater core by itself - with no frame around it - kinda gave it away.

As it turns out, I don't think I need to separate them anyhow. I ran some water through the unit, and it passed through just fine (though the first time, it didn't come out quite as clean as when it went in). And the control valve seems to work fine as well. So, I think the unit is in good shape. I'll have to get it pressure-tested to be sure, though. And I have another Pontoneer who has available the rubber seals needed for under the metal plate.

Friday, November 27, 2009

Black Friday = deals on tools!

Did a bit of poking-about on the internets a couple of days ago, and found that Sears was going to have a LOT of Craftsman stuff on good sales for Black Friday. Picked up a 204-pc mechanic's tool set and a 3-ton jack/jack stands/creeper set, both at 50% of normal. Mwahahha.

I've mentioned my neighbor Frank a couple of times. As it turns out, his brother Edward just rolled into town, and is staying at Frank's place for the duration. Edward is even *more* into car restoration than Frank, and apparently has a lot of time on his hands... so I imagine I'll be roping him into helping out a fair bit.

I showed Edward the car last night. He thought the job wasn't going to be that big a deal - that the car is in really good shape, considering. I hope he's right! It seems like a monster project to me, but I've never tackled anything like this before. I'm trusting in his judgment...

I'm now waiting on a couple of packages... 1) the wood dashboard pieces, and more timely, 2) a package from my cousin with the necessary key to open the gas flap. Going to need to get to the gas tank to drain it, once I get the car towed down to the shop early next week.

Wednesday, November 25, 2009

I've got wood...!

Well, I've got wood ordered, at least.

I just worked a deal with a fellow (Thanks Doug!) to buy some of the wood dashboard pieces from him. Getting replacements for the main dashboard piece, and the two end pieces that sit below (with the vent controls).

Fortunately the rest of my dashboard pieces are in good condition. The plan is to take the lot somewhere and have them stripped and refinished, so that everything is consistent.

Getting these pieces is a bit load off my mind - the wood parts are about the toughest bits of these cars to find, as there are no replacements to be had - the only way to find them is to take them off other cars.

I've also decided on a shop to take the car to next week to see about getting it running. Oddly enough, it's just a few miles from my place!

Monday, November 23, 2009

First things first - get the car running!

Today, I found what I think will be a good shop in my area to take the Merc to, as far as getting it running again. I called them up this morning and asked if they worked on older Mercedes. "How old?" "1958." "OooOOOohh." I explained to the fellow the situation (car doesn't run, ran two years ago, etc.) and he sounded like it probably wasn't a big issue.

The trick at the moment is, one of the things that would need to be done is to have the gas tank drained out. What gas that is in there has been sitting for two years. Bleh. The Merc has a locking flap over the gas cap - and the key to open it, I don't currently have.

There are a few goodies still in the possession of my cousin, including the main door key, which doubles as a gas flap lock key. Or rather, *was* in his possession, until a couple of hours ago. He just shipped the keys and some other stuff (including the old owner's manual) out to me, and I should be seeing this stuff arrive in a couple of days.


This Friday is Black Friday! Big sales. I'm holding off 'til then and then I'm going to stock up on tools and other related necessities (jack stands, work light, etc).

Sunday, November 22, 2009

Old documentation

Amazingly, there's still some old documentation around for my 220S.

Below is a scan of the original bill of sale.


I'm also told that my cousin still has the owner's manual. I'll be picking that up (along with other stuff) next month. But in the meantime, I found where another 220S owner (Hi Lenna!) scanned her owner's manual. I took the collection of JPEG files and turned them into a PDF - which you can grab here.

Saturday, November 21, 2009

A few more goodies.

One of the issues I had with having the car transported out from Atlanta to Denver was the locks/keys.

There were some items - specifically, the hubcaps and a set of fitted luggage - that I would have liked to have come out with the car. However, the trunk lock is currently broken, and I didn't want to risk putting this stuff in the trunk, and having some yahoo decide to go poking around.

Locking these items inside the main passenger area was also not an option - as it might be tempting for someone to just bust out a window (which with the exception of the front windshield, are all original) to get at this stuff.

So, I opted to have my cousin hold onto these bits, and I'll be picking them up and bringing them back with me when I make a roadtrip back to Atlanta for Christmas.

I had my cousin-in-law take some photos of the hubcaps and the luggage today, though.


The luggage is pretty neat. It's a set of four pieces, built to fit within the trunk. The larger two identical pieces stack flat on top of another in the back of the trunk. The smaller, normal-shaped piece sits on the trunk floor, in front of the stacked pair - and the smallest piece sits on top  of that, with the angled side facing up and out; it's angled so it can fit within the remaining space and underneath the curved trunk lid. The trunk had two sets of leather straps with buckles, with which to strap the whole set down once set in place. I'm told sets of this luggage in good condition can fetch around $1000.


While at the grocery store a while ago (fetching more kitty litter with which to soak up the massive oil spill in my garage), I ran into one of my pool league teammates. The conversation eventually rolled around to the car, and my plans to try and get it running sometime soon.

It turns out this fellow is a mechanic. He starts going to town telling me what I ought to do; I had to stop him, telling him that I don't know the first thing about what he's talking about - at least not yet. I said "You should come by and see the car!" - both because I think he'd get a kick out of it, and because he might just be able to help me get the sucker running again. Who knows? He's got my number now, and lives just around the corner, so hopefully soon he'll give me a call and come by.

Friday, November 20, 2009

Opportunity knocks... on wood

So partly due to some posts on the Ponton group on Yahoo... and partly due to my posts on this blog yesterday, I figure - I've gotten a couple of emails from folks who have various wood dashboard pieces available!

I figured that this stuff would be the rarest, and hence most difficult, parts to replace - that I'd be scouring eBay and the net in general for months, hoping to be in the right place at the right time.

It seems I was wrong. :)

More on this later...

More photos.

More photos for all three of you following so far. :)


Photos of a pair of brochures - top is for the car itself, bottom is for accessories. The card below is a price card for the various accessories available - including a set of four pieces of luggage designed to stack in the trunk in a particular way, and pretty much fill up the available area. I've got this luggage set - though it's currently still in Atlanta.


These are some of the wood trim pieces that are currently detached. These pieces sit behind the front windscreen. I believe the notches out of the ends are built to snug up around the rearview mirror mount.

I've been doing some reading on the net - other folks' posts documenting their restoration efforts - and it seems that the joints on these pieces in the corners (you can see a lighter strip there) aren't the most rugged. So I think I'm pretty fortunate that these pieces are still in good shape and not getting ready to separate.


This piece is mounted above the steering column. (Originally thought it mounted below - so the photos were taken from that perspective. Mentally flip them over.) Quite a few holes to hold various switches. It's in good shape overall, but there is some minor damage - not so much "damage" as "wear" I suppose. There is a decent sized crack going between some of the switch mount holes on the left side. I'm hoping that this sort of damage is repairable. My plan is to have all the wood trim stripped down, reconditioned and refinished to a consistent shade.

Oddly enough, I had a couple of conversations with some folks on the big Yahoo group revolving around these cars yesterday - and one of the topics was the damage to some of the wood, and how the wood trim pieces can be the toughest parts to find.

Last night, I got an email from one fellow on the group, saying he has (I believe) a full set of the wood trim, and what do I need? This morning, I wake up to find a second email from another fellow with the dashboard piece, was I interested?

I have to admit, I was stunned. I figured these bits would be the toughest to find, that I would be hunting around for months - and in one day, two people turn up with these parts. Amazing!

FYI, for those of you interested, the Yahoo group folks also have a website with all sorts of great info: http://www.mbzponton.org/. The first photo on the home page - under the title "Spotlight" - that's my car. Well, that's someone else's car, but it's the exact same as mine - 1958 220S sedan, black, same trim/moulding. That's what my car will look like again once I'm done with it.

Thursday, November 19, 2009

Current condition photos

The exterior (still dirty from the cross-country haul). There's a fair bit of rust here and there; patches mainly. No holes. Some small bits of body damage - the worst is just behind the front driver's side wheel, and that's not really bad. Some of the trim along the bottom is missing or simply too mangled. All of the glass (with the possible exception of the windshield) is original. All the head/taillights are in good shape, except for one on each end.

(All images are clickable to get larger versions)


The interior. The seats aren't in good shape. The driver's seat has a huge chunk out of it, and the leather overall is pretty rough. There is a lot of wood trim inside this car - and the vast majority of it is still in good shape. The worst is one piece on the very left end, where a round air vent is - the wood is disintegrating there. This will likely be the most difficult piece to replace.


This looks worse than it is. The starter switch itself apparently quit working - so my cousin took part of the wood dashboard out (the piece that fit around the steering column) and patched in a new switch (which can be seen, bottom right, hanging down with the key danging) in order to start the car.


The steering wheel also has many cracks and will need replacing.


The engine. In many ways, this is the part of the car that's in the best condition. Inline 6-cylinder. I believe this particular model could crank out a whle 105 HP when it was new!


The Merc arrives.

After waffling for a month or so as far as working out how to get the Mercedes from the Atlanta suburbs (where my cousin lives) to the Denver suburbs (where I live), I finally call one of the transport companies I'd gotten estimates from, and pulled the trigger.

The Mercedes rolled in (or rather, was rolled in) this past Sunday. The old girl doesn't run any longer, but was running up until two years ago, when my cousin parked it in his garage. He didn't crank it for those two years; when he did try, nada.

Annoyingly, the day the car arrived was the day after we had a huge dump of snow, which made wrestling around 3500 lbs. of German steel off the flatbed trailer and into my garage a difficult task. After shoveling a lot of the snow out of the way, it still took five of us (the driver and his two companions, myself, and a neighbor) to muscle the car into my garage.

One of the folks who brought the car in (all Turkish guys of Russian descent, it seems) told me that the car was leaking a bit of oil. The day after the car arrived, I find a massive puddle of oil underneath the car. Why the sudden leak? I suspect something happened during transport - either just the weather, or the moving around after sitting still for two years; something came loose, or a seal cracked, or somesuch.

Now, to make a decision - a) to try and get the car running again or b) to skip that and go right into tearing the sucker down. I'm indecisive by nature; I don't know whether it would be worth the time/effort/expense to get the car running again, when I'm just going to disassemble it in a large way soon anyhow. But, this is something Frank suggested - get it running again so that I *know* it's operable, and before I sink money into restoring it. I imagine that's the wise move.

Aaaaaand here we go.

(Despite being in the web development field since before there was really a web development industry - this is my first blog. Be gentle.)

Back in the late 50s, my father was in the Air Force. He was stationed in Spain for two or three years. While over there, he and my mother bought a 1958 Mercedes 220S. When his assignment in Spain was done, they brought the Mercedes back with them to the U.S.

This was our "family car" for many years, though my parents quit driving it regularly when I was still very young. I have some vague childhood memories of riding around in this car.

Years later, when I was in my early 30s, my parents wanted to get rid of the Mercedes. It was taking up one of the two spots in their carport, which my mother really wanted back. *grin* They offered the car to me, but I was too young, I didn't have anywhere decent to store it, I didn't have the income to warrant fixing the car up or keeping it maintained, so I passed on it. Fortunately, one of my cousins said he would take the car, and he kept it running for a good many years.

Late in 2005, I moved back home for a while to take care of my mother, who was very ill; I got to spend her last month and a half with her. Two years ago, I again returned home, this time for my father, who had Alzheimer's; I had a year and a half with him.

After my father had passed, I contacted my cousin, who had the Mercedes. I told him that with my father's passing, I'd been thinking about that old car. He says "Yeah, you want it back?" "Well.. yeah, that's what I was calling about." It turns out he was well ready to be rid of the car as well.

I had decided that I would restore my old family Mercedes. I'm doing it partly as a memorial to my parents - the car will be a near-constant reminder of them when they were younger - and partly because, well dammit, it's a classic old car, and I want to see the looks on people's faces, checking it out when I take it on the road. *shrug*

My neighbor a couple of doors down, Frank, has been restoring a VW Karmann Ghia for the past three years. I'll be leaning on him a fair bit as I get my feet wet with this project; I don't know the first thing about cars, especially old cars, especially restoring old cars.

One of the first things Frank told me was, "Document EVERYTHING. Label EVERYTHING." And I figured, a blog would be one good way to document this project - I'll be able to go back and do searches whenever I wish. Plus, this is a way to share the whole experience.