So last year, while attempting to remove the rear bumper, I hid a small snag. The bumper has four mount points - two on the main part of the bumper, and one on each of the end pieces. The end pieces appear to have a nut welded onto the back of a plate, that accepts a bolt through the bumper mount - and this nut seemed to broken loose, as the bolt was spinning free.
I had puzzled out that the bumper mount itself was detachable and could pass out through the hole in the fender - and several attempts to detach this mount later, I was still in the same boat.
Sadly, I later discovered that I had been going at it all wrong. The small mount piece also had a nut attached - and all that was required was to get the bolt out. And all this time, I was attempting to loosen the nut! Once this was puzzled out, and with the help of a recently acquired breaker bar and several applications of penetrant over time, the bolt itself came loose fairly quickly, the bumper mount was fee, and the bumper finally removed.
With the bumper off, now I can get to work on removing the fenders themselves. Not a huge task, as it turns out. Here's the left rear fender off.
That fender came off so easily and quickly, I didn't even think about taking photos, so time to break out the camera for the right side.
The rear fenders are held on with a combo of bolts/nuts, bolts, and nuts/posts. Here's the forward end of the wheelwell - three bolts/nuts from the bottom up, and then a couple of bolts that thread into the main body above that.
Up inside, at the top of the forward end, a couple more bolts threading into the body, and one post that comes out with a nut attached. Why this and not just another bolt, I don't yet understand.
There is a pair of bolts/nuts at the rear bottom, easily removed, and the balance of attachments are bolts around the inside of the trunk area, that also hold the clips that hold the wiring harness in place. All of these bolts come away easily (though one did snap off - I'll have to drill the remnant out of the right rear fender at some point).
The last connection to the body is this bar that sits behind the rear wheel, some sort of stabilizer. These bolts/nuts have a lot of road grime/gunk on them - and the nut on the left side ends up getting rounded in my efforts to remove it. I ended up cutting it off once the fender was off.
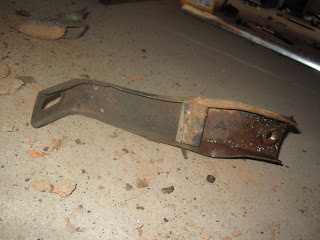
Before removing the fender, I tackle the bumper mounts. There's three pieces to these - the main piece that mounts to the body with two 17mm bolts, (pictured below the fuel filler tube remnant at the top), the mount that the side end of the bumper mounts to, mounted on the main mount piece with a single bolt (left side), and the mount that the main middle section of the bumper mounts to, which cannot be seen here but is attched to the main mount with a pair of bolts from the back side.
Now that I know the score, these bolts all come away with minimal effort.
All three mounts removed, and posed in basically their usual position.
With the mounts out, the fender itself is removed easily, though I had missed that the vent pipe was still attached to a mount on the underside of the body. A quick cut and no problem.
Time to get the fuel filler area disassembled. Grimy! The filler and breather hoses were cut when the tank was removed back in December '09, so no problems there. The flap covering the gas cap is held on by a pair of bolts passing through the bucket on the left side of this photo, held on with nuts. More grime in this area that I poke at with a screwdriver.
The remnant of the vent pipe basically just... fell off. That was easy.
Once the flap mount nuts are cleaned off a bit and hit with penetrant, the nuts release their hold, and the flap comes off.
Next up is removing the upper and lower sleeves. The upper pops off, just a matter of getting some leverage underneath with a flathead.
Once the upper sleeve is off, the fuel filler tube is then free.
The lower sleeve is not as cooperative - and being fifty-three years old, it's hardened a lot. I end up slicing it off with a box cutter. The remnant of the filler tube on the bottom comes off once I get the hose strap opened up with a pair of pliers.
The inside of the filler tube looks to be in fine shape.
The last thing is to remove the Ulonite reflectors off the fenders.
These reflectors are held on with a nut/washer on the inside of the fender.
Sadly, but not unexpectedly, the post on the back of the reflector is old and weak, and snaps off while attempting to get the nut off. Not a big loss, as both reflectors are so faded, there's barely any red left to them anyhow. I'll be looking for replacements for these in due time. I may just stick a placeholder bolt/nut with some rubber to seal it up in place when the time comes, as it shouldn't be difficult to mount new reflectors after the car is back together. The rubber pieces probably could also be replaced with something more generic, cut to the right shape and fit.
Subscribe to:
Post Comments (Atom)


No comments:
Post a Comment