
First thing is to pull out the pieces that are in the floorboard area. A couple of screws toward the rear (which were underneath the seats) frees them up. There were screws on the other end that I had pulled out some time back. The nature of all these screws makes me think they were what mainly held the carpet down, back when there *was* carpet.

What a mess! This stuff has degraded to the point that it's almost soil-like in some places.
It's at this point that I begin discovering some more rust, in the corners at the front of the floorboard area. In this photo, the flash of the camera obscures the light coming in from beneath the car.

Here's a non-flash photo of the passenger side floorboard. The rusted out area is clearly visible. The driver's side is in similar condition.
It's at this point that I posted on the Ponton group, asking about my options on this area, and that Harry got in touch. Tom from the Mercedes Benz Classic Center in California also chimed in to say that they still have factory floorpans available. My front floorpans are kinda rusty, and I may consider getting some new pieces to go in - but this rust appears to be more on the toeboard, which is one piece that spans the width of the car, covering both front seat areas. I'll be emailing Tom and inquiring as to the availability (and pricing, gah!) of these parts soon.
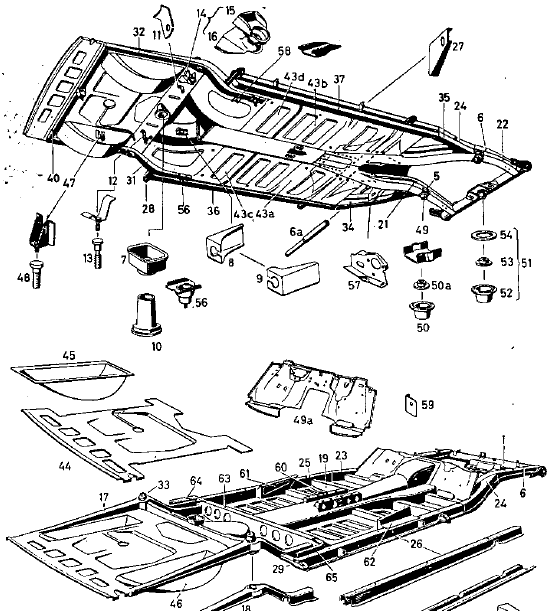
Here's a snap from the old parts book PDF I got ahold of last year. The toeboard is the piece nearly dead center, labeled 49a. I may need a pair of floor pieces as well (top part, labeled 43a & 43b). I'm hoping I can get away with just the toeboard, if need be - it'll largely depend on costs (new piece vs. labor to patch).

Rear passenger floorboard area. The frame to the right is what the rear seat bench sits on.

Last of the floor areas, underneath the rear seat.

Time to get scrapin'. At first I started with a flathead screwdriver, and then found an chisel scraper I had laying around, at which point things progressed much quicker. Here I'm starting to remove the lining from the toeboard.

Underneath the driver's side toeboard lining, I discover a rubber piece that fit between the toeboard and the headlight foot switch. Into the correct baggie with this piece - it looks to be in good, reusable shape.

Lining removal is progressing. Next is to peel away the thicker lining over the transmission cover.

Bit by bit, this stuff comes away. In this photo, you can better see the wiring that is clipped onto the left side of the transmission cover, that snakes back to eventually pass through to the trunk compartment, to power the tail lights.

Front floorboard all de-lined. Lots of surface rust.

Rear area beneath seat area. Several grocery baggies worth of lining scraps are collected and trashed, and a shopvac does the rest.
No comments:
Post a Comment